1. RECEPTION, INSPECTION AND STORAGE
The verification of the correct marking of the product packages, a visual inspection in search of blows or defects and an adequate storage in work contributes to a great extent to ensure that at the moment of the installation there is a suitable material, in correct condition and according to the prescribed in the design.
During the first twenty-four hours after the reception on site it is recommended to review:
- The packaging is not broken or damaged.
- There is no damage to the product caused by improper handling or transport (such as bumps or breaks in corners, sides and edges of the product).

2. HANDLING AND STORAGE
Given the intrinsic conditions of the execution on site, and the simultaneous work of different trades, precautions must be taken to ensure that the doors do not deteriorate.
During storage on site, it is advisable to follow the following instructions:
- Keep packages unopened until use.
- Do not expose the doors to climatic factors that can deteriorate the wood, such as:
• Air currents.
• Sunlight.
• Water
- Do not support or store the packages in contact with the walls, leaving a separation from them of at least 0.5 m.
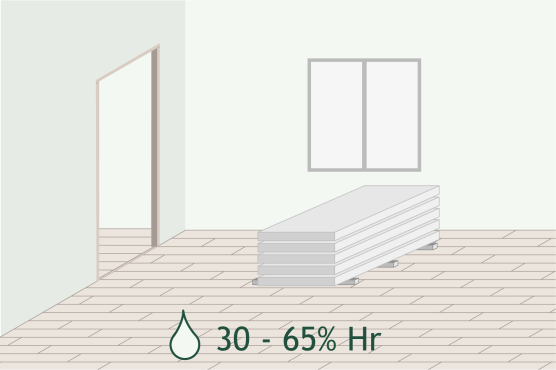
- Stack packages in plane, supported on four equidistant strips or other elements that allow a distance to the ground and in which the support of the packages is produced uniformly (pallets, etc.)
-The humidity of the storage place should be between 30-65%.
3. CONDITIONS BEFORE THE INSTALLATION
In order to guarantee the satisfaction of the commissioning of doors, their installation must be done at the right time and in the right conditions.
This requires a correct sequence in the execution of the works, which will require constant and fluid communication between the parties involved in the project.
On the other hand, the great influence that environmental conditions have on the behavior of this type of carpentry elements makes it necessary to have them under control before and during the installation process.
Finally, to carry out a correct installation of the doors, it is necessary that the support on which it is to be placed fulfills a series of conditions based mainly on the good constructive practices. Thus, it must be clean, have a good surface regularity (flatness and horizontality) and have adequate moisture content.
3.1 Conditions of the work (installation time)
Works on site must be finished before the placement of the doors, exceptionally, the walls may be unpainted.
The floor must be installed, or in any case, must be marked its final height and relevant levels.
3.2 Local and environmentals conditions
Humidity and temperature conditions
Installation should be avoided when the relative humidity is high.
The ideal conditions to maintain before and during the commissioning are:

The moisture content of the wall at the time of installation is a very important factor to avoid moisture transmissions to the door assembly, as well as the problems caused by them. This factor is especially important in the case of veneered elements.
It is therefore necessary to ensure that sufficient time has passed for the correct setting and complete drying of the components of the wall.
The moisture content of the elements of the door assembly influences the behavior of the door once installed.
It is therefore important that at the time of installation the moisture content of these elements is as similar as possible to what is expected to be in use.
The recommended maximum moisture values for carpentry elements are given below:
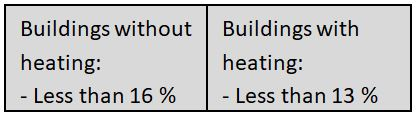
Source: UNE-EN 942:2007
3.3 Support conditions. (sub-frame)
The sub-frame is the set of elements, generally of wood, that are placed in intermediate position between the work (to which they are anchored) and the frame. Its purpose is to serve as a template for the replanning of the work and to facilitate the assembly and disassembly of the door set (hollow of door), without causing damage to the work.
The sub-frame will have to be plumb and squared.


3.4 Leveling of the surface
The floor and walls must be properly levelled and plumb.

4. PLANNING THE INSTALLATION
Before starting the placement of the doors it is advisable to carry out a previous planning that will allow estimating times, to order the processes, to minimize unforeseen.
4.1 Distribution of elements on site
For a correct planning of the installation and distribution of elements, the technical documentation of the work will be reviewed. It is recommended not to remove the protective packaging of the products, until they have been placed in the place in which they are to be installed.
4.2 Sense of openness
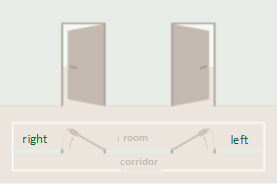
Following the technical documentation of work will confirm the direction of opening of the doors to be installed.
The opening direction is established by standing on the outside of the room. It is distinguished between opening to the right, and opening to the left, according to the following chart:
4.3 Aptitude of hollow of door
There will be verified the dimensions of the free hollow of the sub-frame, to check the aptitude of the hollow with regard to the dimensions of the element to placing.
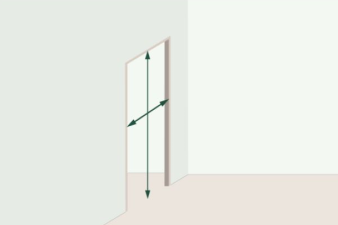
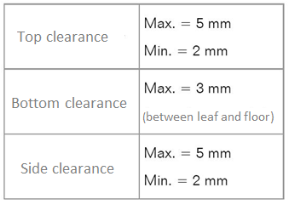
4.4 Planning of clearances
To ensure optimum door operation, the clearances indicated between the assembly and the sub-frame must be respected.
5. PLACEMENT PROCESS
5.1 Generalities
Once the conformity of the product is established and its installation planned, it will proceed to its placement. This can be done in three stages:
• Unpacking and inspection.
• Placement the unit of hollow of the door.
• Final inspection of the installation, prior to commissioning.
5.2 Tools and installation material
The tools and materials normally used to carry out the installation of doors are:
Rubber hammer, screwdriver, drill, level, stapler, compressor, flexometer, square, chisel, polyurethane foam (fire retardant in case of RF doors), miter saw, sander, clamps, white glue...
To unpack, any cutting tool will be avoided.
5.3 Inspection
The faces and edges will be inspected to detect possible defects, such as curvature, warping…
5.4 Process of placement of the doors
The set of elements that constitute the door are supplied in kit: includes mechanized but removed leaf and frame, and the corresponding hardware apart. In fire resistant doors, in no case will supply loose door leaves.
Given the high requirements required for this product, the manufacturer's installation instructions must be strictly followed for optimum installation.
5.5 Presentation of the gap
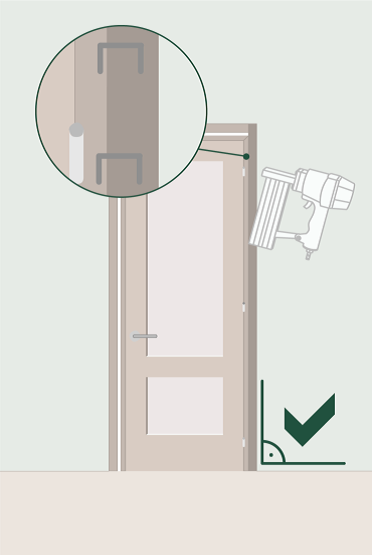
The frame will be assembled with screws or staples.
The hinges will be installed in the frame and at the door.
It will be flush with the ground level, set and pre-assembled with wedges.
5.6 Fixing of hidden hardware
In the case that the upper closure is hidden, it will proceed in this moment to its installation, both in the frame and in the leaf. This must be left with the force to the minimum to be able to work and at the end of the installation will be adjusted.
5.7 Basic fixing of the block
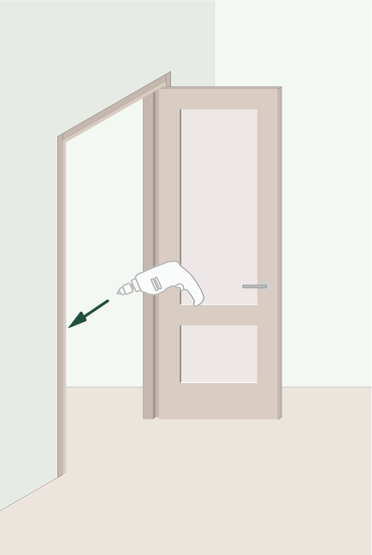
In order to ensure the most accurate, level and plumb fixation possible, start with the side of the frame containing the hinges, taking into account also the door-floor clearance indicated in section 4.4 " Planning of clearances”.
The fixing can also be done with corrugated clips according to the scheme.
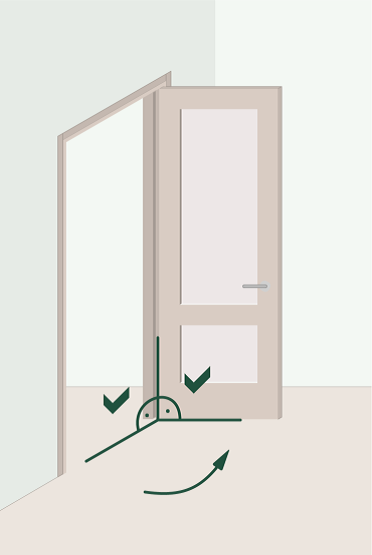
5.8 Checking the squaring
After opening the door completely the check of leveling in all the axes will be realized (rotation on the three axes of coordinates). The door hollow unit must be correctly positioned and squared. Otherwise, the necessary adjustments will be made.
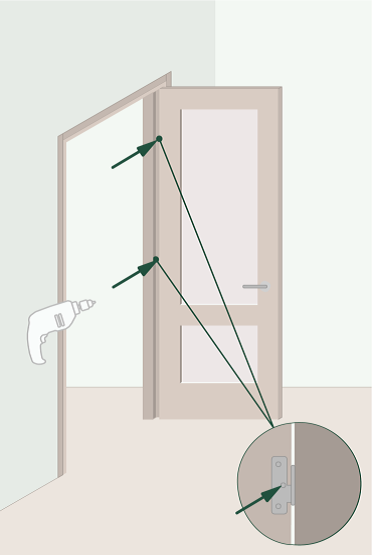
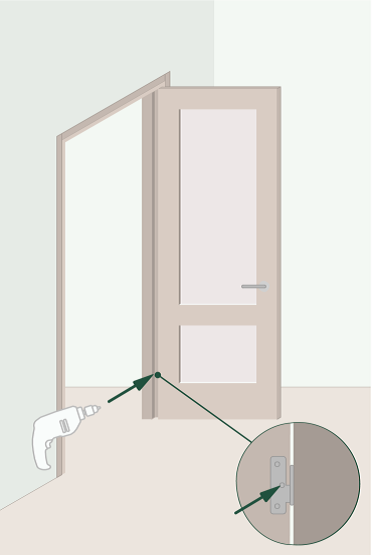
5.9 Basic fixation of the frame
Later one will proceed to the provisional fixation of the frame by means of the central screw of the hinges.
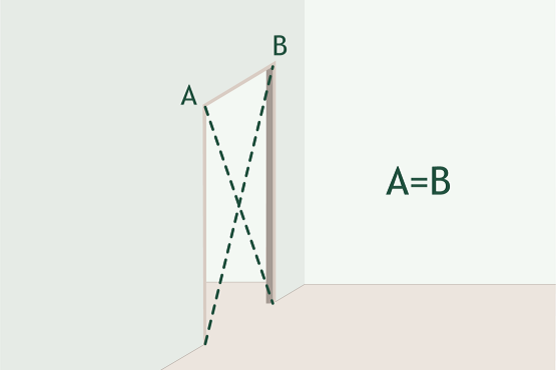
5.10 Checking the leveling or plumb
With help of level and set square, the checking will be realized of levelled in all the axes (rotation on three axes of coordinates), especially in the side of the hinges. Likewise it will be verified that the clearances of the frame with the door leaf are perimetrally equidistant. The block will have to stay correctly leaden and squared.
5.11 Definitive fixation of the frame
The system of fixation of the frame to the sub-frame will be realized by screws through the plate of the lock and the hinges.
5.12 Installation of the hardware in the leaves
The installer will install the hardware in the leaves, hinges, automatic upper and lower closing, handles, etc.
In case the work is not completely finished, it is recommended to leave the automatic lower lock fully raised to prevent deterioration.
5.13 Isolation
The complete subjection and sealing of the frame-pre-frame clearances will be made with polyurethane foam, which will be fireproof in the case of doors of resistance to fire.
5.14 Fixing the architrave
In the first place the elements that will serve as architrave will be cut, so that the cut is towards the bottom (against the ground). They will be presented on the door and the cut-off point (miter joint or right joint) will be marked. The elements will be cut.
In case of extensible architrave, it must be inserted into the recess made in the frame for this purpose, and it must be adjust to the wall.
In case of non-stretchable architrave, it will be fixed with adhesives. White glue may be added to the miter.
5.15. Hardware check
Once the work is complete, the correct installation and operation of all hardware will be verified, as well as the regulation of the automatic lower closing so that the rubber of the closure touches the floor evenly.
If necessary, the adjustment of the latch, as well as the automatic upper locking, whether viewed or concealed, will be regulated.